Understand Language
Increasingly, we expect computers to be able to use AI in order to understand spoken or typed commands in natural language. For example, you might want to implement a home automation system that enables you to control devices in your home by using voice commands such as “switch on the light” or “put the fan on”, and have an AI-powered device understand the command and take appropriate action.
Create Language Understanding Resources
Microsoft cognitive services includes the Language Understanding service, which enables you to define intents that are applied to entities based on utterances. You can use either a Language Understanding or Cognitive Services resource to publish a Language Understanding app, but you must create a separate Language Understanding resource for authoring the app.
- In another browser tab, open the Azure portal at https://portal.azure.com, signing in with your Microsoft account.
- Click + Create a resource, and search for Language Understanding.
- In the list of services, click Language Understanding.
- In the Language Understanding blade, click Create.
- In the Create blade, enter the following details and click Create
- Create option: Both
- Subscription: Select your Azure subscription
- Resource Group: Select an existing resource group or create a new one
- Name: A unique name for your service
- Authoring location: Select any available location
- Authoring pricing tier: Free F0
- Runtime location: Same as authoring location
- Runtime pricing tier: Free F0
- Wait for the resources to be created, and note that two Language Understanding resources are provisioned; one for authoring, and another for prediction. You can view these by navigating to the resource group where you created them.
Create a Language Understanding App
To implement natural language understanding with Language Understanding, you create an app; and then add entities, intents, and utterances to define the commands you want the app to understand:
- In a new browser tab, open the Language Understanding portal at https://www.luis.ai, and sign in using the Microsoft account associated with your Azure subscription. If this is the first time you have signed into the Language Understanding portal, you may need to grant the app some permissions to access your account details. Then complete the Welcome steps by selecting the existing Language Understanding authoring resource you just created in your Azure subscription.
- In the Conversation apps page, create a new app with the following settings:
- Name: Home Automation
- Culture: English
- Description: Simple home automation
- Prediction resource: Your Language Understanding prediction resource
- If a panel with tips for creating an effective Language Understanding app is displayed, close it.
Create intents and entities
An intent is an action you want to perform - for example, you might want to switch a light on, or turn a fan off. In this case, you’ll define two intents: one to switch a device on, and another to switch a device off. For each intent, you’ll specify sample utterances that indicate the kind of language used to indicate the intent.
- In the pane on the left, ensure that Intents is selected Then click Create, and add an intent with the name switch_on (in lower-case) and click Done.
- Under the Examples heading and the Example user input subheading, type the utterance turn the light on and press Enter to submit this utterance to the list.
-
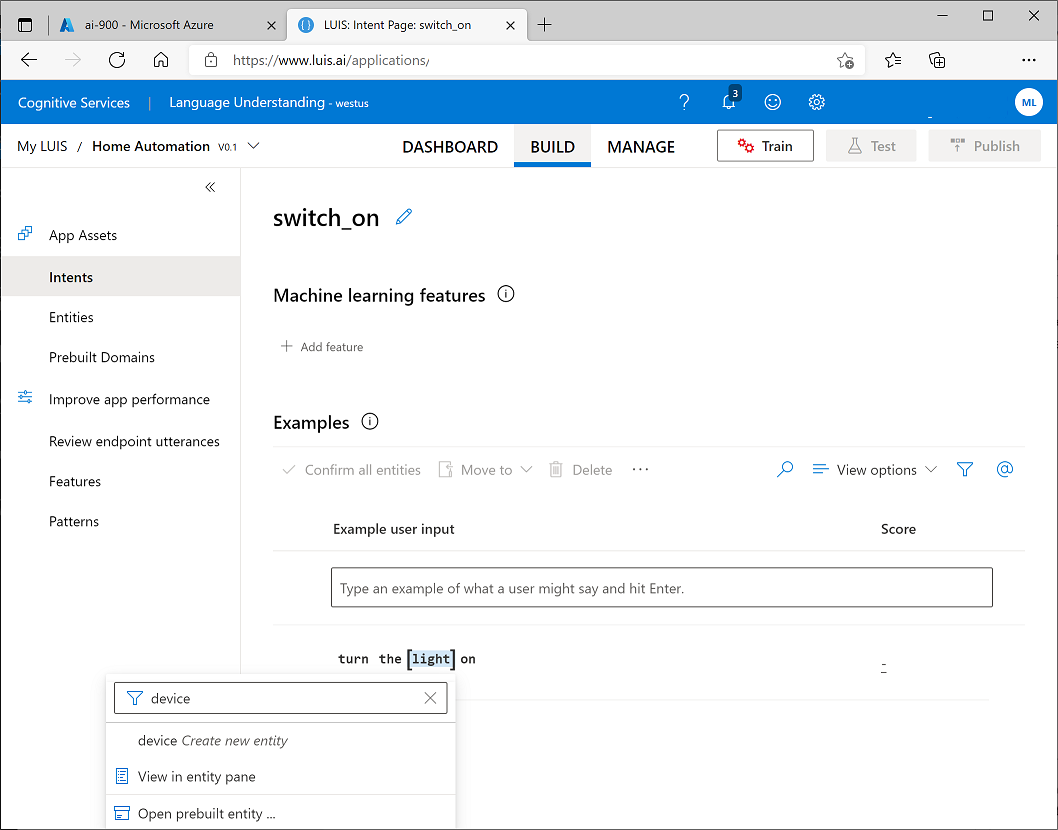
In the turn the light on utterance, select the word “light”. Then in the list that appears, in the Enter an entity name box type device (in lower-case) and select device Create new entity, as shown here:

-
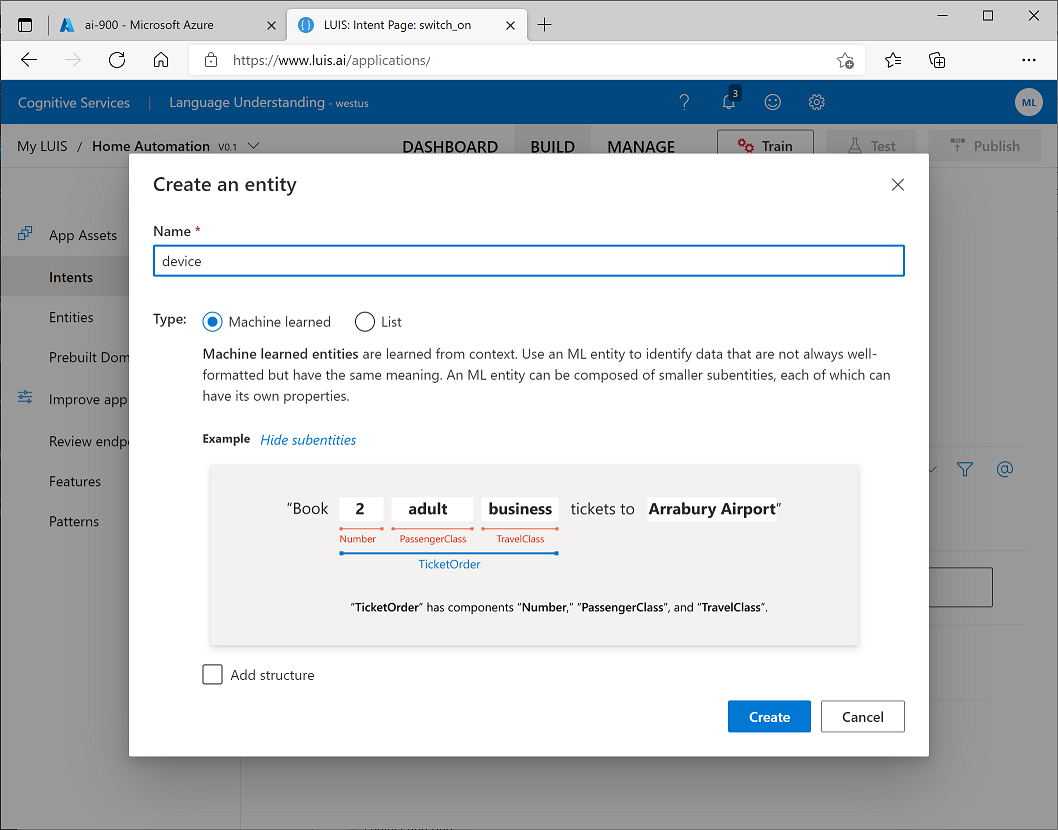
In the Create an Entity dialog box that is displayed, create a machine learned entity named *device.

- Back in the page for the switch_on intent, create a second utterance with the phrase switch on the fan. Then select the word “fan” and assign it to the device entity you created previously.
- In the pane on the left, click Intents and verify that your switch_on intent is listed along with the default None intent, Then click Create and add a new intent with the name switch_off (in lower-case).
- In the page for the switch_off intent, add the utterance turn the light off and assign the word “light” to the device entity.
- Add a second utterance to the switch_off intent, with the utterance switch off the fan. Then connect the word “fan” to the device entity.
Train and Test the Language Model
Now you’re ready to use the intents and entities you have defined to train the language model for your app.
- At the top of the Language Understanding page for your app, click Train to train the language model
- When the model is trained, click Test, and use the test pane to view the predicted intent for the following phrases, noting the predicted intent and inspecting the details to identify predicted ML entities.
- switch the light on
- turn off the fan
- put the light on
- put the fan off
- Close the Test pane.
Publish the Model and Configure Endpoints
To use your trained model in a client application, you must publish it as an endpoint to which the client applications can send new utterances; from which intents and entities will be predicted.
- At the top of the Language Understanding page for your app, click Publish. Then select Production slot and click Done.
- After the model has been published, at the top of the Language Understanding page for your app, click Manage. Then on the Settings tab, note the Application ID for your app. You will need this value later.
- On the Azure Resources tab, note the Primary key and Endpoint URL for your prediction resource. You will also need these later.
Use your Language Understanding app from a client
To consume your language model from a client, we’ll use a simple command-line application that runs in the cloud shell provided with your Azure subscription.
Use a cloud shell
To test the capabilities of the Custom Vision service to detect objects in images, we’ll use a simple command-line application that runs in the cloud shell.
Note: For this lab, you will test out an application in a cloud shell environment. When you build your own application, you can use an environment of your choice.
-
Click the Activate Sandbox button at the top of the page. This starts a Cloud Shell instance to your right, as shown here. You may be prompted to review permissions. Click Accept.

-
When you open the cloud shell, you will need to change the type of shell you are using from Bash to PowerShell. Type in pwsh and press enter.
pwsh
Configure and run a client application
Now that you have a cloud shell environment, you can run a simple client application that uses the Computer Vision service to analyze an image.
-
In the command shell, enter the following command to download the sample application.
git clone https://github.com/GraemeMalcolm/ai-stuff ai-900 -
The files are downloaded to a folder named ai-900. Now we want to see all of the files in your cloud shell storage and work with them. Type the following command into the shell:
code .Notice how this opens up an editor.
-
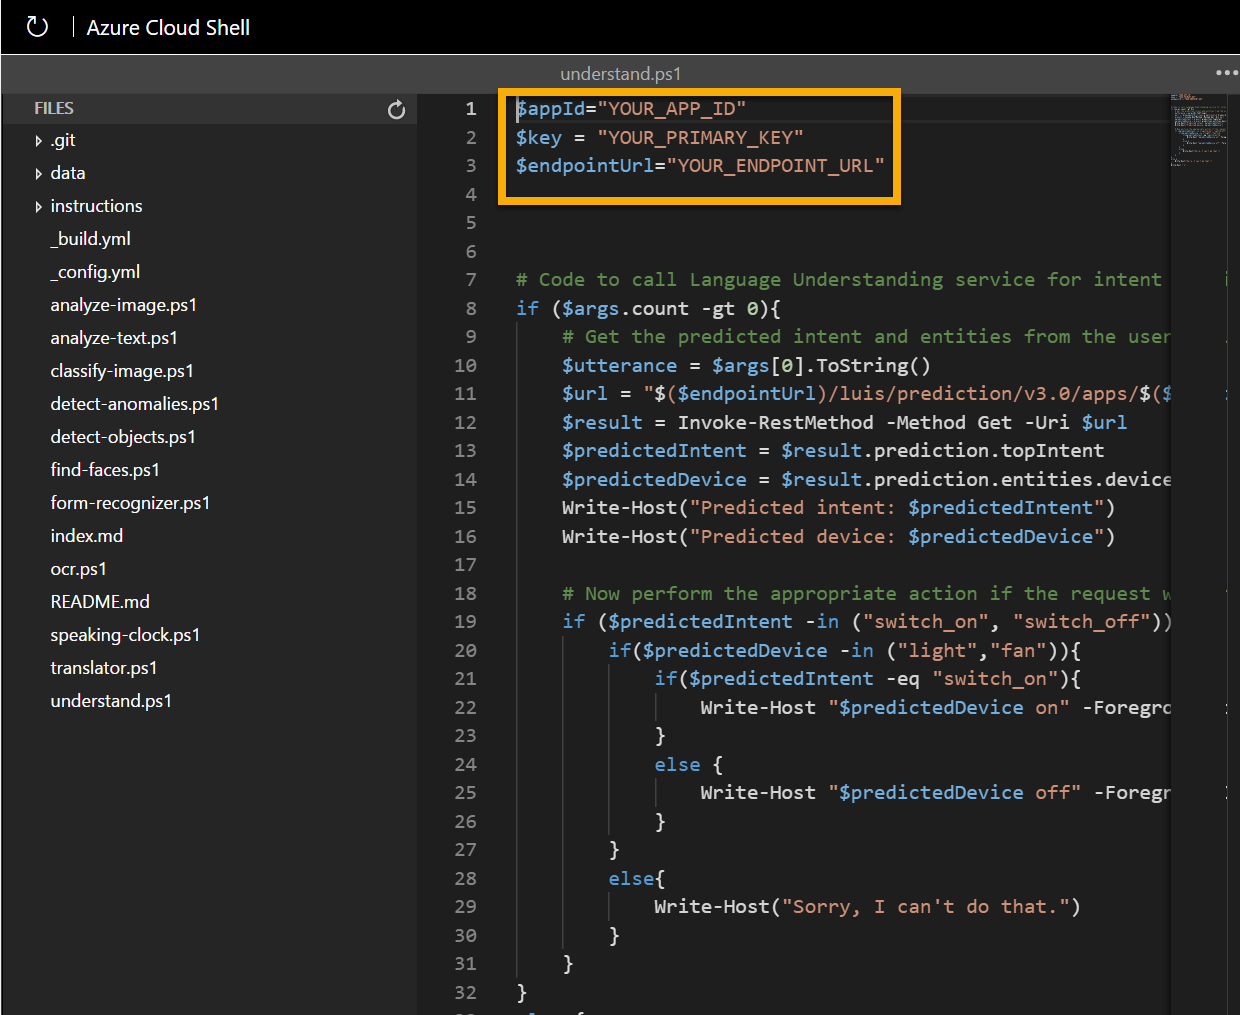
In the Files pane on the left, expand ai-900 and select understand.ps1. This file contains some code that uses your Custom Vision model to classify an image, as shown here:

-
Don’t worry too much about the details of the code, the important thing is that it needs the application ID, key, and endpoint URL for your published language model. Copy these from the Manage page in th Language Understanding portal (which should still be open in another browser tab) and paste them into the code editor, replacing the YOUR_APP_ID, YOUR_PRIMARY_KEY and YOUR_ENDPOINT_URL placeholder values respectively.
After pasting the endpoint and key values, the first two lines of code should look similar to this:
$appId="abc-123-456-def..." $key = "123abc456def789ghi0klmnopq" $endpointUrl="YOUR_ENDPOINT_URL" - At the top right of the editor pane, use the … button to open the menu and select Save to save your changes. Then open the menu again and select Close Editor.
-
In the PowerShell pane, enter the following comman to run the code:
cd ai-900 .\understand.ps1 "Turn on the light" - Review the results - the app should have predicted that the intended action is to switch on the light.
-
Now try another command:
.\understand.ps1 "Switch the fan off" - Review the results from this command- the app should have predicted that the intended action is to switch off the fan.
- Experiment with a few more commands; including commands that the model was not trained to support, such as “Hello” or “switch on the oven”. The app should generally understand commands for which its language model is defined, and fail gracefully for other input.
Learn more
This simple app shows only some of the capabilities of the Language Understanding service. To learn more about what you can do with this service, see the Language Understanding page.