Detect Anomalies with the Anomaly Detector
Anomaly detection is an AI technique used to determine whether values in a series are within expected parameters. For example, a smart HVAC system might use anomaly detection to monitor temperature in a building and raise an alert if the temperature goes above or below the expected value for a given period of time.
Create a Anomaly Detector resource
Let’s start by creating a Anomaly Detector resource in your Azure subscription:
- In another browser tab, open the Azure portal at https://portal.azure.com, signing in with your Microsoft account.
- Click the +Create a resource button, search for Anomaly Detector, and create a Anomaly Detector resource with the following settings:
- Subscription: Your Azure subscription.
- Resource group: Select an existing resource group or create a new one.
- Region: Choose any available region
- Name: Enter a unique name.
- Pricing tier: Free F0
- Review and create the resource, and wait for deployment to complete. Then go to the deployed resource.
- View the Keys and Endpoint page for your Anomaly Detector resource. You will need the endpoint and keys to connect from client applications.
Use a cloud shell
To test the capabilities of the Custom Vision service to detect objects in images, we’ll use a simple command-line application that runs in the cloud shell.
Note: For this lab, you will test out an application in a cloud shell environment. When you build your own application, you can use an environment of your choice.
-
Click the Activate Sandbox button at the top of the page. This starts a Cloud Shell instance to your right, as shown here. You may be prompted to review permissions. Click Accept.

-
When you open the cloud shell, you will need to change the type of shell you are using from Bash to PowerShell. Type in pwsh and press enter.
pwsh
Configure and run a client application
Now that you have a cloud shell environment, you can run a simple client application that uses the Computer Vision service to analyze an image.
-
In the command shell, enter the following command to download the sample application.
git clone https://github.com/GraemeMalcolm/ai-stuff ai-900 -
The files are downloaded to a folder named ai-900. Now we want to see all of the files in your cloud shell storage and work with them. Type the following command into the shell:
code .Notice how this opens up an editor.
-
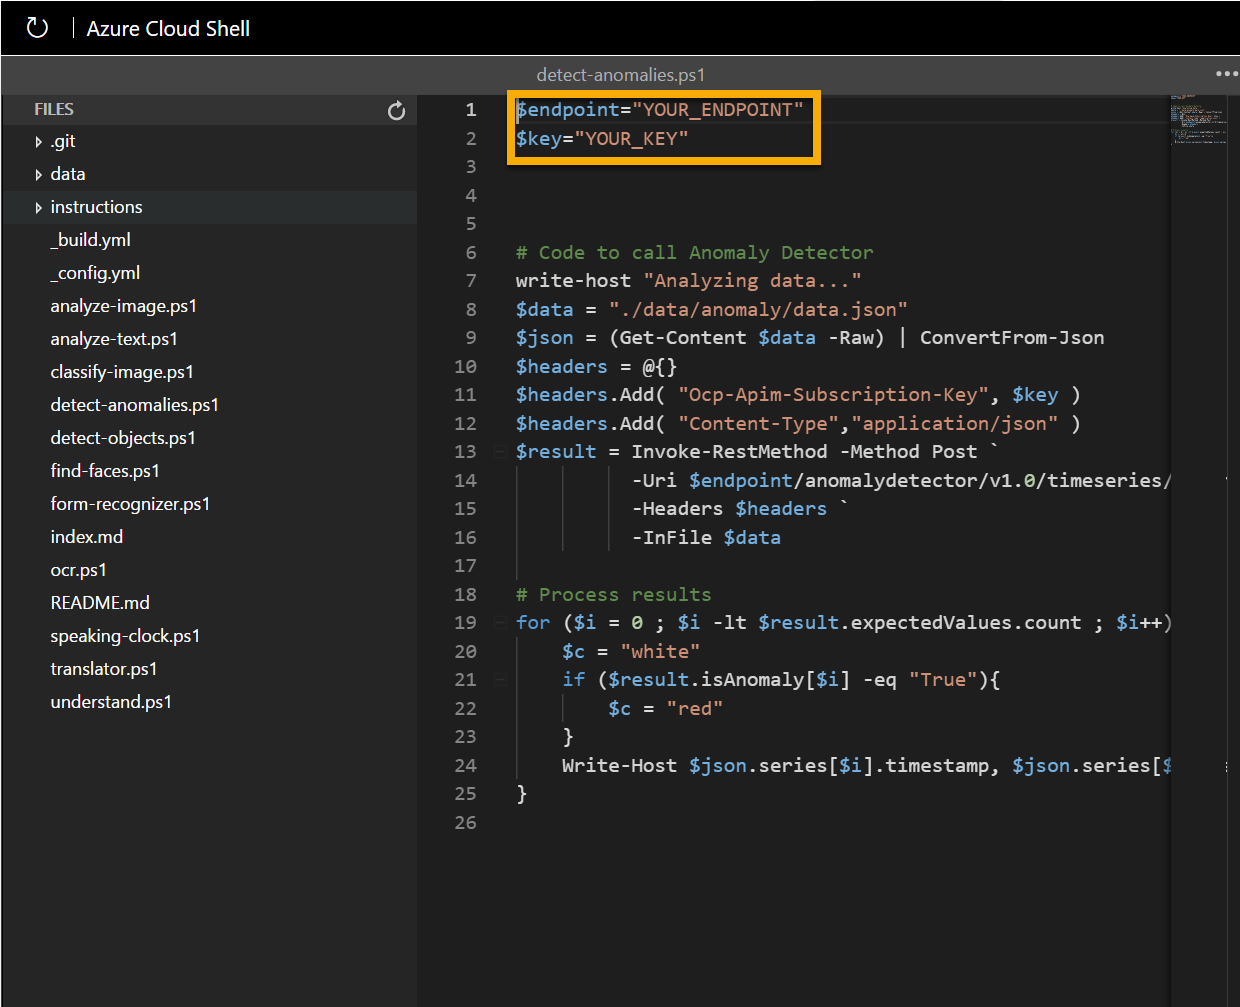
In the Files pane on the left, expand ai-900 and select detect-anomalies.ps1. This file contains some code that uses the Anomaly Detector service to detect anomalous values in a data series, as shown here:

-
Don’t worry too much about the details of the code, the important thing is that it needs the endpoint URL and either of the keys for your Anomaly Detector resource. Copy these from the Keys and Endpoints page for your resource (which should still be in the top area of the browser) and paste them into the code editor, replacing the YOUR_ENDPOINT and YOUR_KEY placeholder values respectively.
Tip: You may need to use the separator bar to adjust the screen area as you work with the Keys and Endpoint and Editor panes.
After pasting the endpoint and key values, the first two lines of code should look similar to this:
$endpoint="https://resource.cognitiveservices.azure.com/" $key="1a2b3c4d5e6f7g8h9i0j...." -
At the top right of the editor pane, use the … button to open the menu and select Save to save your changes. Then open the menu again and select Close Editor.
The sample client application will use your Anomaly Detector service to analyze a file containing a series of date/times and numeric values.
-
In the PowerShell pane, enter the following commands to run the code:
cd ai-900 .\detect-anomalies.ps1 -
Review the results, noting that the final column in the results is True or False to indicate if the value is considered an anomaly:
Learn more
This simple app shows only some of the capabilities of the Anomaly Detector service. To learn more about what you can do with this service, see the Anomaly Detector page.